

I envy my DBA colleagues when they work with the Oracle Database from the command line in an incredibly efficient way. They just call a series of scripts with some parameters to get the desired information. Everything looks so easy, so smooth, so natural.
I’m a developer. Basically a mouse pusher. I like to work in an IDE. It’s comfortable. However, I’d also like to use some of these fancy SQL*Plus scripts from the IDE in an easy way. This means, the scripts have to be accessible and executable via mouse clicks only. The keyboard is used when changing the default values of parameters. Is something like that possible? – Of course. In this blog post, I show how.
ashtop.sql – The Script to Integrate
Tanel Poder provides an extensive collection of useful SQL*Plus scripts in his TPT Oracle GitHub repository. One of them is ashtop.sql. Here’s the header:
-- Copyright 2018 Tanel Poder. All rights reserved. More info at http://tanelpoder.com
-- Licensed under the Apache License, Version 2.0. See LICENSE.txt for terms & conditions.

--------------------------------------------------------------------------------
--
-- File name:   ashtop.sql v1.2
-- Purpose:     Display top ASH time (count of ASH samples) grouped by your
--              specified dimensions
--
-- Author:      Tanel Poder
-- Copyright:   (c) http://blog.tanelpoder.com
--
-- Usage:
--     @ashtop <grouping_cols> <filters> <fromtime> <totime>
--
-- Example:
--     @ashtop username,sql_id session_type='FOREGROUND' sysdate-1/24 sysdate
--
-- Other:
--     This script uses only the in-memory V$ACTIVE_SESSION_HISTORY, use
--     @dashtop.sql for accessiong the DBA_HIST_ACTIVE_SESS_HISTORY archive
--
--------------------------------------------------------------------------------
Line 14 shows the usage and line 17 is an example.
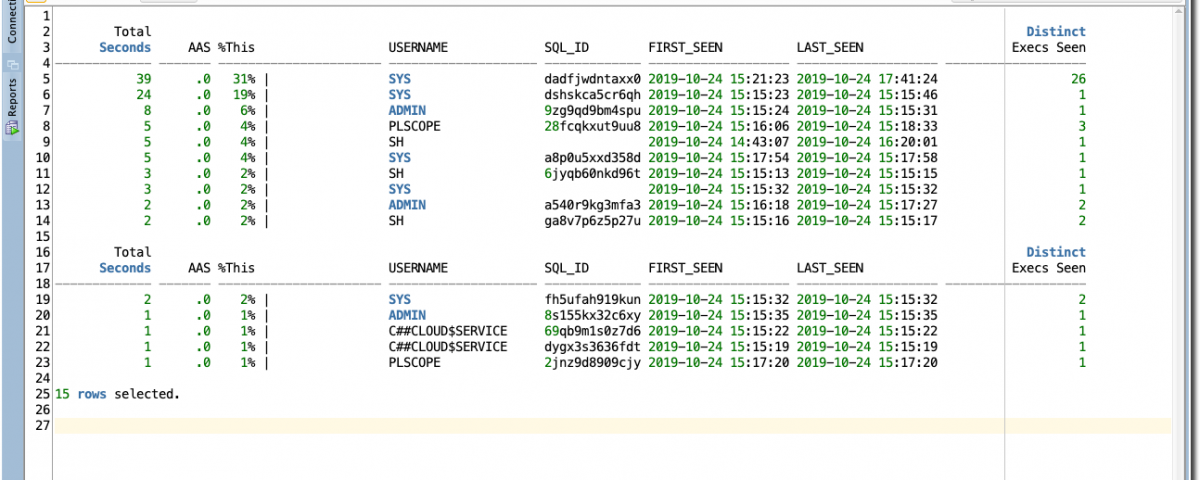
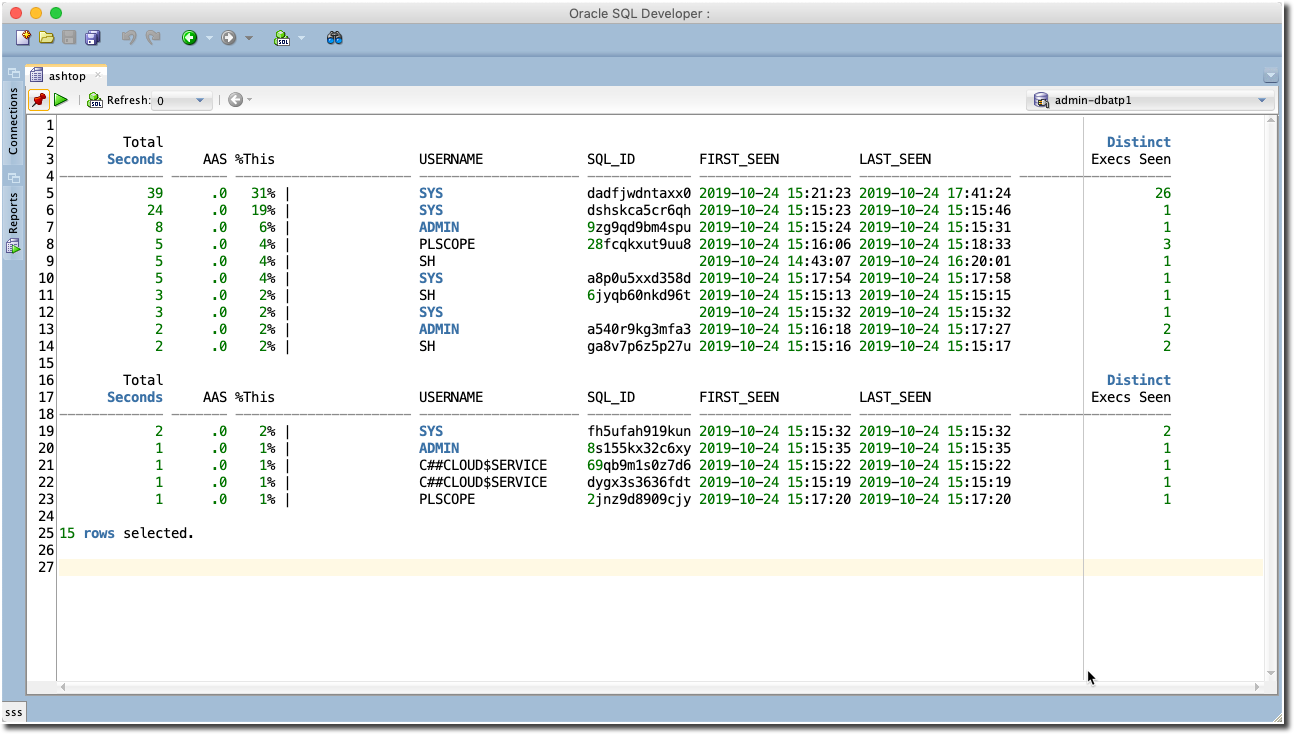
And here’s the output of the example call against my Oracle Cloud ATP instance:
        Total                                                                                                                      Distinct
      Seconds     AAS %This                  USERNAME             SQL_ID        FIRST_SEEN          LAST_SEEN                    Execs Seen
------------- ------- ---------------------- -------------------- ------------- ------------------- ------------------- -------------------
           24      .0   28% |                SYS                  dshskca5cr6qh 2019-10-24 15:15:23 2019-10-24 15:15:46                   1
            8      .0    9% |                ADMIN                9zg9qd9bm4spu 2019-10-24 15:15:24 2019-10-24 15:15:31                   1
            5      .0    6% |                PLSCOPE              28fcqkxut9uu8 2019-10-24 15:16:06 2019-10-24 15:18:33                   3
            5      .0    6% |                SYS                  a8p0u5xxd358d 2019-10-24 15:17:54 2019-10-24 15:17:58                   1
            5      .0    6% |                SYS                  dadfjwdntaxx0 2019-10-24 15:21:23 2019-10-24 15:34:09                   3
            3      .0    3% |                SH                   6jyqb60nkd96t 2019-10-24 15:15:13 2019-10-24 15:15:15                   1
            3      .0    3% |                SYS                                2019-10-24 15:15:32 2019-10-24 15:15:32                   1
            2      .0    2% |                ADMIN                a540r9kg3mfa3 2019-10-24 15:16:18 2019-10-24 15:17:27                   2
            2      .0    2% |                SH                   ga8v7p6z5p27u 2019-10-24 15:15:16 2019-10-24 15:15:17                   2
            2      .0    2% |                SH                                 2019-10-24 14:43:07 2019-10-24 15:15:12                   1
            2      .0    2% |                SYS                  fh5ufah919kun 2019-10-24 15:15:32 2019-10-24 15:15:32                   2
            1      .0    1% |                ADMIN                8s155kx32c6xy 2019-10-24 15:15:35 2019-10-24 15:15:35                   1
            1      .0    1% |                C##CLOUD$SERVICE     69qb9m1s0z7d6 2019-10-24 15:15:22 2019-10-24 15:15:22                   1
            1      .0    1% |                C##CLOUD$SERVICE     dygx3s3636fdt 2019-10-24 15:15:19 2019-10-24 15:15:19                   1
            1      .0    1% |                PLSCOPE              2jnz9d8909cjy 2019-10-24 15:17:20 2019-10-24 15:17:20                   1
The columns username and sql_id are the group by columns. When I change the first parameter and pass just username the result looks like this:
        Total                                                                                                        Distinct
      Seconds     AAS %This                  USERNAME             FIRST_SEEN          LAST_SEEN                    Execs Seen
------------- ------- ---------------------- -------------------- ------------------- ------------------- -------------------
           46      .0   53% |                SYS                  2019-10-24 15:15:23 2019-10-24 15:34:09                  10
           16      .0   19% |                PLSCOPE              2019-10-24 15:15:35 2019-10-24 15:18:34                  11
           11      .0   13% |                ADMIN                2019-10-24 15:15:24 2019-10-24 15:17:27                   4
            8      .0    9% |                SH                   2019-10-24 14:43:07 2019-10-24 15:15:47                   5
            3      .0    3% |                SONAR                2019-10-24 15:15:32 2019-10-24 15:15:35                   2
            2      .0    2% |                C##CLOUD$SERVICE     2019-10-24 15:15:19 2019-10-24 15:15:22                   2
Actually, I can use every combination of columns in gv$active_session_history and dba_users as grouping columns. A nice SQL*Plus script.
Let’s integrate ashtop.sql in SQL Developer.
Step 1 – Install tpt-oracle
Download or clone Tanel Poder’s Troubleshooting Scripts (TPT) from GitHub. I keep these scripts on my MacBook in `/Users/phs/github/tpt-oracle`.
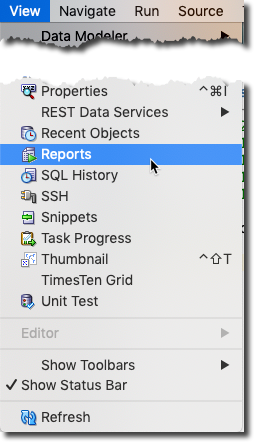
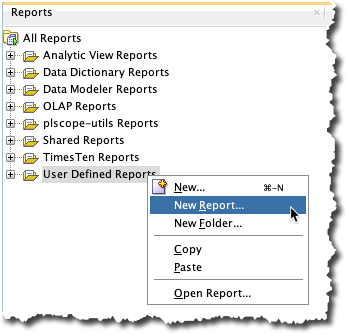
Step 2 – Create New Report
Select Reports from the view menu
and then right-click on User Defined Reports and select New Report... from the context menu.
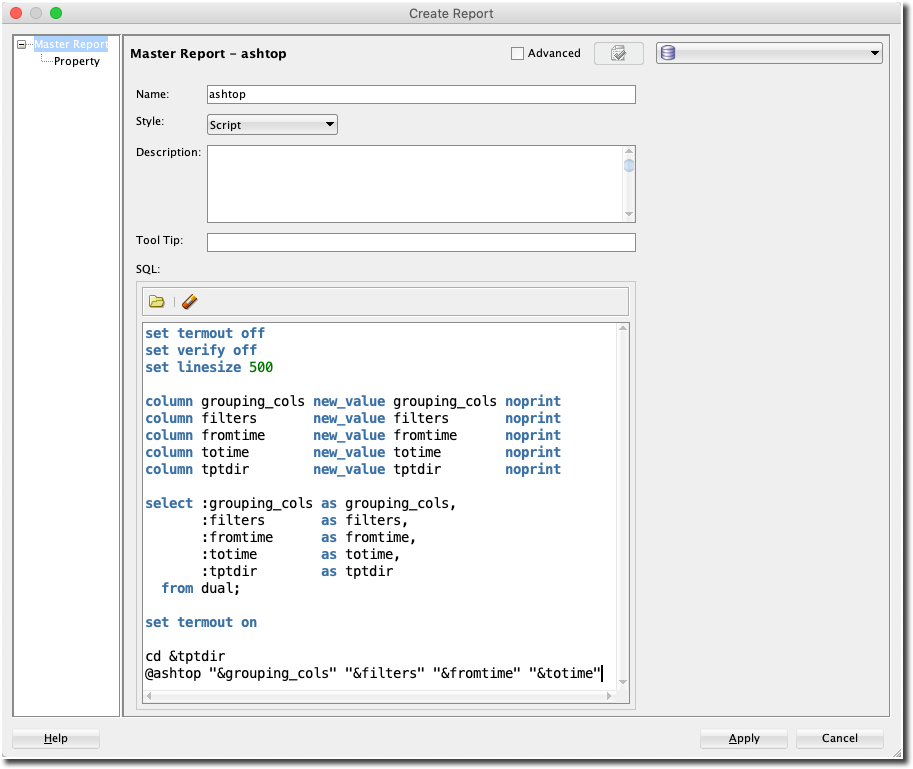
In the new window type ashtop in the name field, change the style to Script, copy the following script and paste it into the SQL field:
set termout off
set verify off
set linesize 500

column grouping_cols new_value grouping_cols noprint
column filters       new_value filters       noprint
column fromtime      new_value fromtime      noprint
column totime        new_value totime        noprint
column tptdir        new_value tptdir        noprint

select :grouping_cols as grouping_cols,
       :filters       as filters,
       :fromtime      as fromtime,
       :totime        as totime,
       :tptdir        as tptdir
  from dual;

set termout on

cd &tptdir
@ashtop "&grouping_cols" "&filters" "&fromtime" "&totime"
And press Apply.
Step 3 – Set Defaults for Bind Variables
We have defined 5 bind variables in this report. :grouping_cols, :filters, :fromtime, :totime and :tptdir. They are converted to SQL*Plus substitution variables and then passed to the ashtop.sql script. We can execute the report now, but NULL is the default value of all bind variables. This is not very convenient. Hence, we are going to change that.
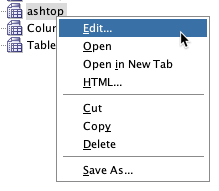
Right-click on the ashtop report and select Edit... from the context menu.
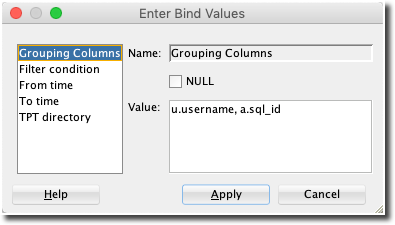
Click on Binds and set the values according the following screenshot. Important is the Default column.
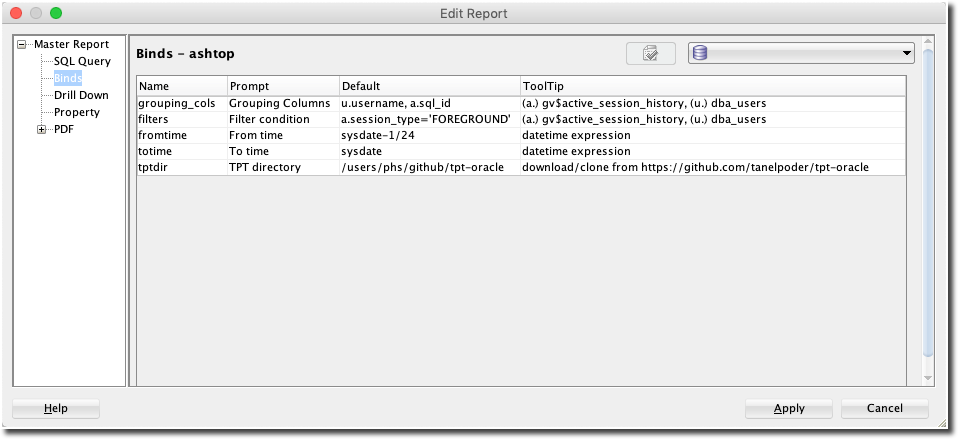
And press Apply.
Step 4 – Save Report
To save the report you have to Select Save All from the File menu. The report is then saved in your UserReports.xml file in your ${ide.pref.dir} directory. You find the value of this variable in the Properties tab of the About Oracle SQL Developer dialog.
Step 5 – Run Report
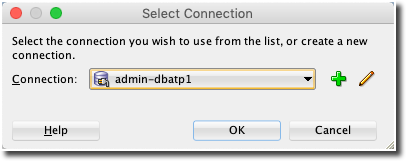
Click on the ashtop report. Select a connection from this dialog and press OK.
Then you can optionally change the values of the bind variables in this dialog.
Press Apply and then the script is executed and the result is shown in a new tab.
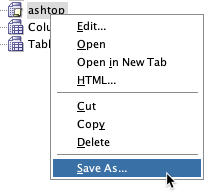
Step 6 – Save Report as XML File
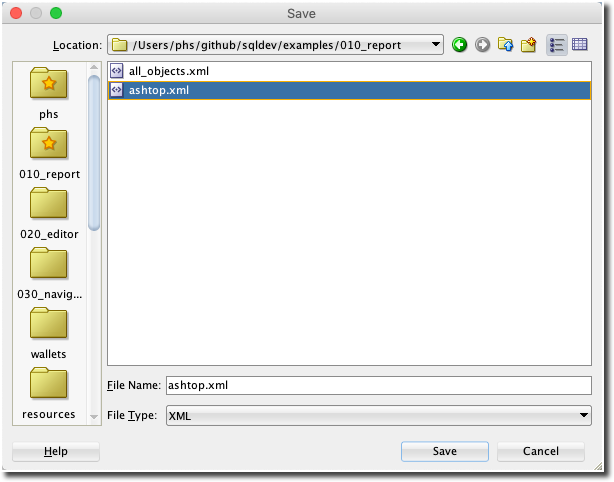
Right-click on the ashtop report and select Save As... from the context menu.
And then save the report in a directory of your choice.
Step 7 – Configure Report as User-defined Extension
You can configure the previously saved report in the SQL Developer’s preferences as user-defined extension as shown here:
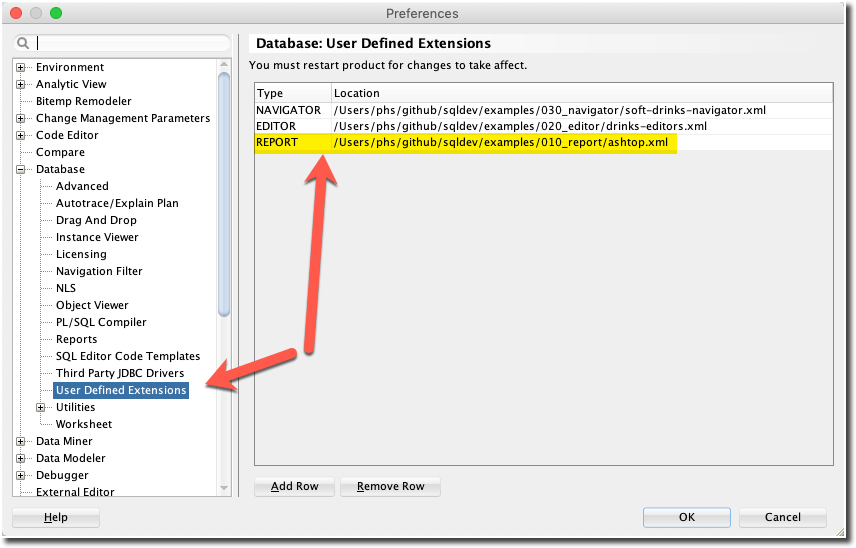
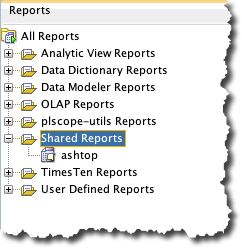
After restarting SQL Developer the configured report is shown under Shared Reports:
Summary
SQL Developer reports can be based on SQL but also SQL*Plus scripts. Calling external scripts has the advantage that I only have to maintain the interface to the SQL*Plus script within SQL Developer. This way I can install new versions of the scripts, for example by fetching updates from a Git repository and these new script versions are used the next time I run a report from SQL Developer.
Updated on 2019-10-25, new screenshot in step 2, formatted code, mentioned that the style needs to be changed to Script. Thanks, Dani Schnider for your feedback.