

ARM Docker Images Now Available
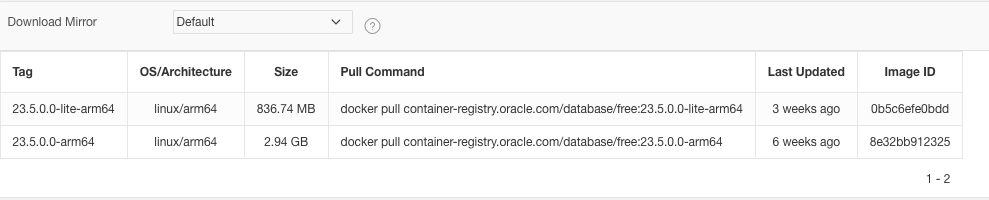
With the release of version 23.5 of Oracle Database 23ai, ARM builds are now available for Docker images.
On the official Oracle Container Registry:
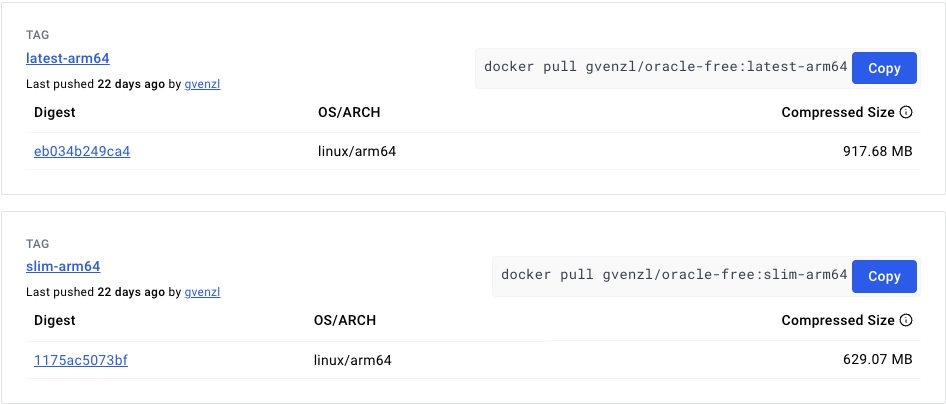
And on Docker Hub provided by Gerald Venzl:
This makes it very easy to use the Oracle Database on a Mac with an Apple silicon chip.
Starting Position
I got my MacBook Pro 16″ with an Apple M1 Max chip with 10 cores, 64 GB RAM and 4 TB disk in November 2021. At that time, the M1 chip had already been on the market for a year and I knew that there were problems when running virtual machines or Docker containers with the Intel x86_64 architecture. Most of my colleagues decided to go with a database instance in the cloud. However, I like the ability to develop offline and I often need an Oracle Database. And disk space is not an issue.
My solution was to run Windows on ARM in Parallels Desktop and install the Oracle Database there. Microsoft did a tremendous job running Intel-based software under Windows on ARM. As far as I remember I did not experience a single crash. And the performance was similar to the Oracle Databases that ran in a Docker container on my Mac mini Server with a 2.3 GHz Intel Quad-Core i7.
I tried other solutions based on QEMU like UTM, but the performance was unbearable slow. So, I lived with my Oracle Database under Windows. Happily until 4th April 2023. The release date of Oracle Database 23c Free.
Oracle Database 23c Free
The Oracle Database 23c Free is available as Linux RPM, VirtualBox VM or Docker image. There are two distributions for the Docker image:
- Oracle’s official image (container-registry.oracle.com/database/free)
- Gerald Venzl’s images (gvenzl/oracle-free) in the flavours
thin,regular,fullandfaststart
Gerald and the team at Oracle managed to allow us to download Oracle software without forcing us to log in and accept some license agreements. This is super cool, especially in CI environments.
Gerald mentions also the limitation regarding the Oracle Database Free on Apple M chips and points to Colima. I have not used Colima before, however, it sounds like the way to go until Oracle releases their flagship database system for ARM.
What is Colima?
Colima provides an alternative context for Docker containers. Docker containers do not run natively on macOS. Instead, the context provides a virtual machine and the containers run there. The idea is that we do not need to know that there is a VM behind the scenes. Mostly.
Docker Desktop provides already a VM. Why do we need an alternative or an additional VM? Well, I see the following reasons:
- Firstly, you can use Colima as a replacement for Docker Desktop.
- Secondly, you have more control over the configuration of the virtual machine, and this effectively allows you to run an Oracle Database in a Docker container on a macOS machine with an Apple M-Series chip.
It’s important to note, that Colima can run side-by-side with Docker Desktop. You can change the current context via the docker context command. However, Docker Desktop 4.17.0 is not able to see “foreign” contexts. This means when you work with Colima you do that from the command line.
Prerequisites
For the next steps, you will need the following:
- A Mac with an M-Series chip,
- with macOS Ventura 13.3.1 or newer,
- Internet access,
- and the ability to work in a terminal window and execute
sudocommands.
So, let’s get started.
Step 1 – Install Homebrew
Run the following command in a terminal window, if you have not installed homebrew already:
/bin/bash -c "$(curl -fsSL https://raw.githubusercontent.com/Homebrew/install/HEAD/install.sh)"If you already have installed homebrew, then update your installation as follows:
brew updateYou might be asked to upgrade outdated formulae. – You know what to do.
Step 2 – Install Colima
We install the stable version of Colima via homebrew. See the installation guide for all options.
brew install colimaStep 3 – Create Colima VM
Now we can start Colima. The initial start creates the virtual machine. We pass a minimal set of parameters to override the defaults where necessary.
colima start \
    --arch x86_64 \
    --vm-type=vz \
    --vz-rosetta \
    --mount-type=virtiofs \
    --memory 4
This command produces a VM with 2 CPUs, 4 GB RAM and 60 GB disk space. The architecture is x86_64. To improve the performance we use the virtualization framework of macOS 13 vz, enable Rosetta 2 and use the macOS-specific volume mount driver virtiofs.
The VM is created in $HOME/.lima. The configuration of the VM is stored in $HOME/.colima/default/colima.yaml. Most of the settings can be changed, but require a restart of the VM (via colima restart or colima stop followed by colima start).
Starting Colima changes the context to colima and stopping it changes it back to default. Use docker context use to change the context.
Updated on 2023-04-19:
The x86_64 architecture prohibits the use of Rosetta 2. Colima falls back silently to QEMU. Providing `–arch aarch64` enables Rosetta 2. However, it will not be possible to start an Oracle Database. You will get the same errors as with the default Docker context. As a result, you do not need to pass the highlighted parameters.
Step 4 – Create 23c Container
We want to create a container with a volume mapped to a local directory. Due to various permission issues, it is not that simple to achieve that directly. It’s easier if we create an internal Docker volume (within the VM) first.
docker run -d \
    --name 23c \
    -p 1522:1521 \
    -v 23c-data:/opt/oracle/oradata \
    container-registry.oracle.com/database/free
We use Oracle’s distribution of the image. It will be pulled automatically. The volume 23c-data is also created automatically.
To monitor the console output we run the following command:
docker logs -tf 23cHere’s the log output with timestamps. The database was up and running after 38 seconds.
2023-04-16T10:16:43.392545000Z Starting Oracle Net Listener.
2023-04-16T10:16:44.057130000Z Oracle Net Listener started.
2023-04-16T10:16:44.057316000Z Starting Oracle Database instance FREE.
2023-04-16T10:17:19.544454000Z Oracle Database instance FREE started.
2023-04-16T10:17:19.547911000Z
2023-04-16T10:17:19.705193000Z The Oracle base remains unchanged with value /opt/oracle
2023-04-16T10:17:21.584419000Z #########################
2023-04-16T10:17:21.584722000Z DATABASE IS READY TO USE!
2023-04-16T10:17:21.584981000Z #########################
2023-04-16T10:17:21.669542000Z The following output is now a tail of the alert.log:
2023-04-16T10:17:21.720236000Z FREEPDB1(3):Opening pdb with Resource Manager plan: DEFAULT_PLAN
2023-04-16T10:17:21.720480000Z 2023-04-16T10:17:17.657677+00:00
2023-04-16T10:17:21.720530000Z Completed: Pluggable database FREEPDB1 opened read write
2023-04-16T10:17:21.720563000Z Completed: ALTER DATABASE OPEN
2023-04-16T10:17:21.720592000Z 2023-04-16T10:17:19.761876+00:00
2023-04-16T10:17:21.720620000Z ===========================================================
2023-04-16T10:17:21.720647000Z Dumping current patch information
2023-04-16T10:17:21.720673000Z ===========================================================
2023-04-16T10:17:21.720698000Z No patches have been applied
2023-04-16T10:17:21.720722000Z ===========================================================
We can press Ctrl-C once we see this output.
Step 5 – Change Passwords
The database was created with random passwords for SYS, SYSTEM and PDBADMIN. To change them we run the following:
docker exec -it 23c ./setPassword.sh oracleAs result, we expect the following SQL*Plus console output:
The Oracle base remains unchanged with value /opt/oracle

SQL*Plus: Release 23.0.0.0.0 - Developer-Release on Sun Apr 16 10:18:57 2023
Version 23.2.0.0.0

Copyright (c) 1982, 2023, Oracle.  All rights reserved.


Connected to:
Oracle Database 23c Free, Release 23.0.0.0.0 - Developer-Release
Version 23.2.0.0.0

SQL>
User altered.

SQL>
User altered.

SQL>
Session altered.

SQL>
User altered.

SQL> Disconnected from Oracle Database 23c Free, Release 23.0.0.0.0 - Developer-Release
Version 23.2.0.0.0
That’s it if you are happy with a Docker volume.
If you’d like the volume to be mapped to a local directory on your Mac, then read on.
Step 6 – Export Volume
There are several ways to export a volume. The following script uses a helper container to access the volume and copy the content to the local directory which we want to use in the future as the replacement for the Docker volume.
docker stop 23c
mkdir -p $HOME/docker/23c-data
docker run --rm \
    -v 23c-data:/source \
    -v $HOME/docker:/target \
    ubuntu tar czvf /target/23c-data.tar.gz /source
sudo tar xvpfz $HOME/docker/23c-data.tar.gz \
    --strip-components=1 -C $HOME/docker/23c-data
Step 7 – Change Permissions
We used sudo tar xvpfz... previously to ensure that we can create all files in the target directory with the same permissions as in the original Docker volume. However, this does not seem to be enough.
sudo chown 54321:54321 $HOME/docker/23c-data
sudo chmod -R 777 $HOME/docker/23c-data
sudo chmod 4640 $HOME/docker/23c-data/dbconfig/FREE/orapwFREE
orapwFREE is the password file. It needs restrictive permission to work.
If you’d like to have the user oracle and the group oinstall also on your Mac, then you can run the following:
sudo dscl . -create /Groups/oinstall
sudo dscl . -create /Groups/oinstall name oinstall
sudo dscl . -create /Groups/oinstall gid 54321
sudo dscl . -create /Users/oracle
sudo dscl . -create /Users/oracle name oracle
sudo dscl . -create /Users/oracle uid 54321
sudo dscl . -create /Users/oracle PrimaryGroupID 54321
sudo dseditgroup -o edit -a oracle -t user oinstall
sudo dseditgroup -o edit -a $USER -t user oinstall
sudo dscl . -create /Groups/oinstall GroupMembership oracle
sudo dscl . -create /Groups/oinstall GroupMembership $USER
After that the output of cd $HOME/docker;ls -lR 23c-data should look similar to this:
total 0
drwxrwxrwx  15 oracle  oinstall  480 Apr 16 12:16 FREE
drwxrwxrwx   3 oracle  oinstall   96 Apr 16 12:16 dbconfig

23c-data/FREE:
total 4928904
drwxrwxrwx  7 oracle  oinstall         224 Apr 16 12:16 FREEPDB1
-rwxrwxrwx  1 oracle  oinstall    18759680 Apr 16 12:19 control01.ctl
-rwxrwxrwx  1 oracle  oinstall    18759680 Mar 28 15:28 control02.ctl
drwxrwxrwx  6 oracle  oinstall         192 Apr 16 12:16 pdbseed
-rwxrwxrwx  1 oracle  oinstall   209715712 Apr 16 12:16 redo01.log
-rwxrwxrwx  1 oracle  oinstall   209715712 Apr 16 12:19 redo02.log
-rwxrwxrwx  1 oracle  oinstall   209715712 Apr 16 12:16 redo03.log
-rwxrwxrwx  1 oracle  oinstall   576724992 Apr 16 12:19 sysaux01.dbf
-rwxrwxrwx  1 oracle  oinstall  1216356352 Apr 16 12:19 system01.dbf
-rwxrwxrwx  1 oracle  oinstall    20979712 Mar 28 15:24 temp01.dbf
-rwxrwxrwx  1 oracle  oinstall    26222592 Apr 16 12:19 undotbs01.dbf
-rwxrwxrwx  1 oracle  oinstall     5251072 Apr 16 12:19 users01.dbf

23c-data/FREE/FREEPDB1:
total 1464400
-rwxrwxrwx  1 oracle  oinstall  325066752 Apr 16 12:19 sysaux01.dbf
-rwxrwxrwx  1 oracle  oinstall  293609472 Apr 16 12:19 system01.dbf
-rwxrwxrwx  1 oracle  oinstall   20979712 Apr 16 12:17 temp01.dbf
-rwxrwxrwx  1 oracle  oinstall  104865792 Apr 16 12:19 undotbs01.dbf
-rwxrwxrwx  1 oracle  oinstall    5251072 Apr 16 12:19 users01.dbf

23c-data/FREE/pdbseed:
total 1454144
-rwxrwxrwx  1 oracle  oinstall  325066752 Mar 28 15:27 sysaux01.dbf
-rwxrwxrwx  1 oracle  oinstall  293609472 Mar 28 15:27 system01.dbf
-rwxrwxrwx  1 oracle  oinstall   20979712 Mar 28 15:25 temp01.dbf
-rwxrwxrwx  1 oracle  oinstall  104865792 Mar 28 15:27 undotbs01.dbf

23c-data/dbconfig:
total 0
drwxrwxrwx  8 oracle  oinstall  256 Apr 16 12:16 FREE

23c-data/dbconfig/FREE:
total 48
-rwxrwxrwx  1 oracle  oinstall   449 Mar 28 15:28 listener.ora
-rwSr-----  1 oracle  oinstall  2048 Apr 16 12:19 orapwFREE
-rwxrwxrwx  1 oracle  oinstall   779 Mar 28 15:28 oratab
-rwxrwxrwx  1 oracle  oinstall  3584 Apr 16 12:17 spfileFREE.ora
-rwxrwxrwx  1 oracle  oinstall    69 Mar 28 15:28 sqlnet.ora
-rwxrwxrwx  1 oracle  oinstall   690 Mar 28 15:28 tnsnames.ora
Step 8 – Remove Container & Volume
Now we can remove the existing 23c Container and its associated volume.
docker rm 23c
docker volume prune -f
Step 9 – Recreate 23c Container
Finally, we recreate the container as in step 4. The only difference is the volume. We use now a local directory.
docker run -d \
    --name 23c \
    -p 1522:1521 \
    -v $HOME/docker/23c-data:/opt/oracle/oradata \
    container-registry.oracle.com/database/free
To monitor the console output we run the following command:
docker logs -tf 23cHere’s the log output with timestamps. The database was up and running after 40 seconds.
2023-04-16T10:27:31.320723000Z Starting Oracle Net Listener.
2023-04-16T10:27:31.958206000Z Oracle Net Listener started.
2023-04-16T10:27:31.958391000Z Starting Oracle Database instance FREE.
2023-04-16T10:28:08.401153000Z Oracle Database instance FREE started.
2023-04-16T10:28:08.404032000Z
2023-04-16T10:28:08.520502000Z The Oracle base remains unchanged with value /opt/oracle
2023-04-16T10:28:11.555842000Z #########################
2023-04-16T10:28:11.565430000Z DATABASE IS READY TO USE!
2023-04-16T10:28:11.565936000Z #########################
2023-04-16T10:28:11.670669000Z The following output is now a tail of the alert.log:
2023-04-16T10:28:11.697019000Z FREEPDB1(3):Opening pdb with Resource Manager plan: DEFAULT_PLAN
2023-04-16T10:28:11.697309000Z 2023-04-16T10:28:07.384593+00:00
2023-04-16T10:28:11.697423000Z Completed: Pluggable database FREEPDB1 opened read write
2023-04-16T10:28:11.697460000Z 2023-04-16T10:28:07.573292+00:00
2023-04-16T10:28:11.697490000Z ===========================================================
2023-04-16T10:28:11.697518000Z Dumping current patch information
2023-04-16T10:28:11.697545000Z ===========================================================
2023-04-16T10:28:11.697581000Z No patches have been applied
2023-04-16T10:28:11.697606000Z ===========================================================
2023-04-16T10:28:11.697633000Z Completed: ALTER DATABASE OPEN
We can press Ctrl-C once we see this output.
Summary
Thanks to the prepared database files within the Docker image we can start an Oracle Database quite fast. Even on a Mac with an M-Series chip. Mounting a folder as a volume needs a bit of fiddling. I like to mount volumes this way because they are easy to share and I can reset the underlying VM without losing data.
The runtime performance of the Database in a Colima container is still bad, compared to my Intel i7 Mac mini and the Oracle Database under Windows on ARM. Depending on the workload it is 5 to 10 times slower. Sometimes even more. I do not see a big difference with or without Rosetta 2. That’s a bit disappointing. Maybe I do something wrong and someone can point me in the right direction. Microsoft showed what’s possible.
Anyway, I’m not sure if I’m going to use a database within Colima during my live demos. But I will definitely keep one ready as a backup.
Hopefully, Oracle will release an ARM version of their Database soon.
Updated on 2022-11-02, Rosetta 2 cannot be used with X86_64 architecture. Colima silently falls back to QEMU. To use Rosetta 2 you need to pass --arch aarch64 when creating the Colima VM. However, it will not be possible to start an Oracle Database. You will get the same errors as with the default Docker context. Added a note in step 3 and crossed out the relevant parts in the summary.
Updated on 2024-11-05, new section “ARM Docker Images Now Available” at the top of the post.
43 Comments
Hello Philipp,
thanks for the great blog post about this topic!
As I’ve also a M1 Device, I wanted to give it a try – and indeed it worked. Due to the slow (network) emulation used, I’m not able to connect the 23c DB to a ORDS Container (on the same docker network) though. Do you have any experience with that?
Cheers,
Niko
Thank you, Niko. I just answered a question on Twitter regarding ORDS. It works when you run ORDS in the default context.
The ORDS Docker image is available for ARM (aarch64), hence you get the optimal performance. You can do the following when you’ve installed the database according to this blog post:
1. Prepare Volumes for Password and ORDS configuration
2. Change the docker context to the default context
3. Create the ORDS container
docker run -d --rm --name ords \
    -v $HOME/docker/ords/ords_secrets:/opt/oracle/variables \
    -v $HOME/docker/ords/ords_config:/etc/ords/config \
    -p 8181:8181 container-registry.oracle.com/database/ords:latest
4. Watch the progress
This image comes also with APEX 22.2.0. By default it will be also installed. Since the Database is quite slow, the APEX installation takes a bit more time than usual. Be patient the console output of the ORDS container provides all information to monitor the progress.
Once ORDS is installed you can connect to it via this URL: http://localhost:8181/ords . Enter “internal” for workspace, “admin” for username and “Welcome_1” for password.
The container activates Database Actions by default. You can reach it via this URL: http://localhost:8181/ords/sql-developer . At this point, you have to enable an ordinary schema for REST.
I’ve done the following as
SYS:And then as
ADMIN:begin ords.enable_schema( p_enabled => true, p_schema => 'ADMIN', p_url_mapping_type => 'BASE_PATH', p_url_mapping_pattern => 'admin', p_auto_rest_auth => false ); commit; end; /Afterwards, you can log in as ADMIN in Database Actions.
Cheers,
Philipp
Hello Philipp,
worked like a charm – thank you very much! I was not aware that we can setup ORDS on ARM and do a docker context switch to connect the ORDS container with the DB Container running in colima.
Safed my a lot of trouble.
Cheers,
Niko
Thanks for the feedback.
It’s important to note that the communication happens via the host (your Mac). The two Docker VMs do not know each other, but both know the host. IMO that’s an elegant way to communicate between containers.
I run everything that is possible in the default docker context, even containers based on x86_64 architecture. Performance with Rosetta 2 is quite good. However, Rosetta 2 cannot handle all x86_64 instructions and the Oracle Database seems to use some of them. Hence we have to stick with Colima and QEMU for the time being.
I was facing a problem with Oracle23c Docker if I tried to map to a local volume, I just tried your way, but had an error starting colima.
FATA[0000] unknown flag: –vz-rosetta
It sounds like you are using an old version of Colima or do not meet the prerequisites. What’s the output of
colima --version? It should becolima version 0.5.4. See also https://github.com/abiosoft/colima/issues/630Yes you are right, it was becuase of old version, now colma started, I am pulling the image from the registry. I will see what will happen.
Thanks.
After running this piece of code and following each step,
docker run --rm \-v 23c-data:/source \
-v $HOME/docker:/target \
ubuntu tar czvf /target/23c-data.tar.gz /source
the “23c-data.tar.gz” is not created.
also, the “23c-data” folder is empty
I cannot reproduce this. What is the console output you get? What is the output of
docker volume ls?Sorry To bother you, but It didn’t work if you can help, here is the console output
> docker exec -it 23c ./setPassword.sh Oracle123
The Oracle base remains unchanged with value /opt/oracle
SQL*Plus: Release 23.0.0.0.0 – Developer-Release on Tue Apr 25 12:47:04 2023
Version 23.2.0.0.0
Copyright (c) 1982, 2023, Oracle. All rights reserved.
Connected to:
Oracle Database 23c Free, Release 23.0.0.0.0 – Developer-Release
Version 23.2.0.0.0
SQL>
User altered.
SQL>
User altered.
SQL>
Session altered.
SQL>
User altered.
SQL> Disconnected from Oracle Database 23c Free, Release 23.0.0.0.0 – Developer-Release
Version 23.2.0.0.0
> docker stop 23c
23c
> ls
apex docker-oracle-ords oracle ords
> mkdir -p $HOME/docker/23c-data
> docker run –rm \
-v 23c-data:/source \
-v $HOME/docker:/target \
ubuntu tar czvf /target/23c-data.tar.gz /source
tar: Removing leading `/’ from member names
/source/
/source/FREE/
/source/FREE/system01.dbf
/source/FREE/sysaux01.dbf
/source/FREE/redo03.log
/source/FREE/control02.ctl
/source/FREE/control01.ctl
/source/FREE/users01.dbf
/source/FREE/pdbseed/
/source/FREE/pdbseed/system01.dbf
/source/FREE/pdbseed/sysaux01.dbf
/source/FREE/pdbseed/undotbs01.dbf
/source/FREE/pdbseed/temp01.dbf
/source/FREE/undotbs01.dbf
/source/FREE/temp01.dbf
/source/FREE/redo02.log
/source/FREE/.prebuiltdb
/source/FREE/FREEPDB1/
/source/FREE/FREEPDB1/system01.dbf
/source/FREE/FREEPDB1/sysaux01.dbf
/source/FREE/FREEPDB1/users01.dbf
/source/FREE/FREEPDB1/undotbs01.dbf
/source/FREE/FREEPDB1/temp01.dbf
/source/FREE/redo01.log
/source/.FREE.created
/source/dbconfig/
/source/dbconfig/FREE/
/source/dbconfig/FREE/oratab
/source/dbconfig/FREE/tnsnames.ora
/source/dbconfig/FREE/sqlnet.ora
/source/dbconfig/FREE/orapwFREE
/source/dbconfig/FREE/listener.ora
/source/dbconfig/FREE/spfileFREE.ora
> ls
23c-data apex docker-oracle-ords oracle ords
> docker volume ls
DRIVER VOLUME NAME
local 23c-data
Looks good. A
$HOME/docker/23c-data.tar.gzshould have been produced.Sorry to say it is not,
I ran the command “ls” If you can see in the log above, it shows only my current directories.
23c-data apex docker-oracle-ords oracle ords
I’m running out of ideas. These are the versions I use:
Your issue sounds similar to https://github.com/abiosoft/colima/issues/503 . So, I’d try to seek help there, if you cannot figure out the issue yourself.
Thank you.
Hi, Philipp. Sorry for the stupid question, I am a new learner of database. After following all the step you shared, how can I access the database like what I did in window PC? do I need to install a sql plus to access the database?
This blog post is about how to run Oracle Database 23c Free on an Apple Silicon chip. To run it on a Windows PC this blog post is not helpful. Have a look at https://www.oracle.com/database/free/download/. At the moment there is no dedicated Windows version available. However, you can download the VirtualBox variant. It’s probably the easiest way to get it up and running on Windows.
Oh, sorry. My present is not good. I mean I have a experience on using Oracle database in a window PC, but now I use a M2 mackbook air, and install a database following your instruction. But after installed, how can I start to access the database? I was using sql plus to access database when I was using Window PC, how about MacOS?
If you want to use SQL*Plus you can open a terminal and run
docker exec -it 23c bashto open a shell in the container. However, I would install SQLcl or SQL Developer or another IDE such as dBeaver.Hi Philip, may stupid question.
can you provide me username and password to connect using sql developer
In “Step 5 – Change Passwords” the password of
sys,systemandpdbadminare changed tooracle.Hi Philip, would like to ask, after I shutdown PC, and try to connect to SQL developer, the connection is not working anymore. Would like to ask how to up the db again? I hope you can help. Thanks.
The container should still be available. Therfore starting colima and the container should do the trick. Something like this should work:
Hi Philip, thanks for the swift response. I tried it but its not working. Its just displaying 23c.
my bad, its just delay. its working now. thank you!
Hello! I am trying to connect the database through DBeaver, but the container IP is not responding. Through bash it works perfect. The IP that I get from the container is 172.17.0.2 (default of the container) How can I configure the connection through the IDE? Thanks for such a fabulous tutorial. It is perfect.
172.17.0.2 is the IP address of the container within the VM. DBeaver is running outside of the VM and you have to access it with the IP of your machine. You can get it via
ipconfig getifaddr en0or simply uselocalhostor127.0.0.1.Hello Philip, How do I upgrade my APEX to 23.2? As the docker only pulls APEX 23.1.
This is a problem when a Docker image provides multiple products as in this case ORDS and APEX. I’m sure the image will eventually be updated. I guess when a new version of ORDS is provided the APEX version will be updated as well. If you cannot wait then I suggest following the instructions in the APEX documentation regarding upgrade and installation.
Hi Phillip, what you cant say about this problem https://github.com/abiosoft/colima/issues/705?
After running colima start –arch x86_64 –memory 4,
i got message,
[hostagent] Waiting for the essential requirement 1 of 3: “ssh”
And after couple minutes i got
the most interesting moment is that colima was working for me and at one point stopped starting, i mannualy reinstall docker/qemu/lima/colima
and it didnt help, also i updated to Sonoma 14.1.1 (23B81)
I have a machine with macOS 14.1.1. Colima works there. Also the conatainer with the Oracle Database 23.3. So I guess your Colima setup is corrupt. I had similar issues in the past. What helped in my case is to completely uninstall Colima and its virtual machines and then reinstall it. Yes, you will lose all containers and all data. Anyway, I kindly ask you to seek help via issues in the GitHub repository of Colima. Thanks.
Sorry Phillipp can you advice on an error below?
Connection error!java.sql.SQLRecoverableException: IO Error: The Network Adapter could not establish the connection (CONNECTION_ID=4VQyB59DSjekazwgy+H3mQ==)
I guess the issue is not directly related to this blog post. Please seek help in the Oracle Forums. Thank you.
Hello,
I copied/pasted steps 1-5 but when I opened my Docker Desktop there wasn’t a 23c image. Any idea what I might have done wrong? I’m on a MacbookPro M3 running Sonoma 14.4.1. Docker is version 25.0.3, build 4debf41. If I run
docker logs -tf 23c
again, I get
Error response from daemon: No such container: 23c
It’s expected that you do not see the container in Docker Desktop. I have no idea what you’ve done wrong. I checked the instruction on my machine (MacOS 14.4.1) and it works. I suggest to start over and ensure that you use Colima.
Hi Philipp,
Please help me with a piece of advice.
On a mac M1 I installed UTM and Oracle Linux with Oracle 19c for Arm. It’s great.
But I struggle how to install:
– Oracle forms and reports
– Oracle Apex
I installed Windows 11 for Arm in UTM and Oracle forms and reports but it takes looong looong time to start the http service…
You said something that Parallels it has better performance.
Should I give it a try?
Oracle has an VirtualBox image for Apex (database included). But, how can I run it on mac?
I think I cannot install Apex in a Linux (under UTM) to have the same setup live that VirtualBox image has.
So the only choice is install it only on Windows arm? On UMT/Parallels?
Thank yoy
Please ask questions that are not directly related to this blog post in the Oracle Forums. Thank you.
ok. thank you
I hope I am not annoying.
So, Oracle Database 23c runs better in Parallels than in UTM?
thank you
I have not tried to run Windows on ARM in UTM. However, I expect the performance to be comparable between Parallels and UTM when you use an OS with the same CPU architecture.
Hi Philipp,
I tried your steps and was able to get Oracle 23 running on my Mac M1 Pro. Now, I wanted to install ords and followed the steps you mentioned in one of the comments, but when I run the docker command, I get the error “docker: Cannot connect to the Docker daemon at unix:///var/run/docker.sock. Is the docker daemon running?.”. My db is up and running and I am able to run queries, so that would mean docker is running, right?
When you run ORDS in the emulated VM, you get timeouts. Instead of changing configuation to make it work, it’s far better from a performance point of view to run ORDS in a ARM VM. Either via Colima or via Docker for Mac. See https://www.salvis.com/blog/2023/04/16/oracle-database-23c-on-a-mac-with-an-m-series-chip/#comment-109090 .
Hi Philipp,
That’s exactly what I was trying to do – followed your steps that you posted in Comments about installing ORDS via Colima. The issue I face is that when I try to create a docker container for ORDS, I get the error that docker daemon is not running. But I believe its running since I can access the DB. I believe the problem might be because, based on your steps, I am changing Docker context and so, not in Colima (maybe?). Also, I cannot run Docker as a desktop VM (due to company restrictions), so have to use Colima to get ORDS installed.
I used Docker Desktop for the ORDS container.
However, it should work with Colima.
Please make sure you run ORDS in a VM with aarch64 architecture. With Colima, you can create multiple profiles (VMs). In my case, it looks like this
The OracleDB container would run with the “default” profile and the ORDS container with the “m1” profile with aarch64 architecture. This way you avoid all kinds of weird errors due to the slow CPU emulation.
See https://github.com/abiosoft/colima/discussions/609 if you have problems switching contexts locally.
I tried installing oracle 23c in macOS m1 and without success and came across this thread.
I tried Colima start as suggested with the 2 options and get this error now
Use “colima [command] –help” for more information about a command.
agneskingsly@Agness-MacBook-Air ~ % colima status
FATA[0000] colima is not running
agneskingsly@Agness-MacBook-Air ~ % colima start \
–arch x86_64 \
–memory 4
WARN[0000] ‘architecture’ cannot be updated after initial setup, discarded
INFO[0000] starting colima
INFO[0000] runtime: docker
INFO[0002] starting … context=vm
> Using the existing instance “colima”
> Starting the instance “colima” with VM driver “qemu”
> QEMU binary “/opt/homebrew/bin/qemu-system-aarch64” seems properly signed with the “com.apple.security.hypervisor” entitlement
> [hostagent] hostagent socket created at /Users/agneskingsly/.colima/_lima/colima/ha.sock
> exiting, status={Running:false Degraded:false Exiting:true Errors:[] SSHLocalPort:0} (hint: see “/Users/agneskingsly/.colima/_lima/colima/ha.stderr.log”)
FATA[0003] error starting vm: error at ‘starting’: exit status 1
Any help you can provide to get my oral instance running will be appreciated. I spent too many hours without success
You need to use a Colima VM with x86_64 architecture. Use “colima list” to show all your profiles (VMs). You can manage the profiles with the colima CLI. See https://github.com/abiosoft/colima for questions regarding colima. Thanks.